Here we will look at how to set up Softvision Explorer Professional 4 and the wireless router in order to create a Hotspot that uses routers with OpenWRT, DD-WRT and CoovaAP firmware or any
other system that can manage a Hotspot with RADIUS certification. To see a complete list of RADIUS solutions supported by Softvision Explorer,
please consult the page
Systems compatible with RADIUS Hotspot.
Creating a Location
The first step is to create a new location. Firstly let's consider the case of a location in which the wireless router is connected to the same local network as the server. The system's connection diagram is the following :
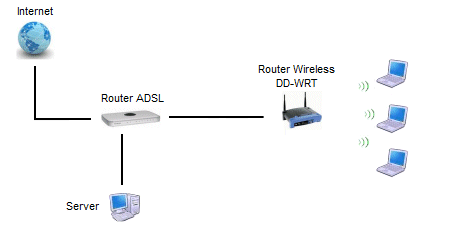
To create or modify a location we access the RADIUS Hotspot section present in the 'Set up' | 'Preferences' function in Explorer Manager.
For example, we insert a new location that uses a wireless router with DD-WRT firmware connected to our local network.
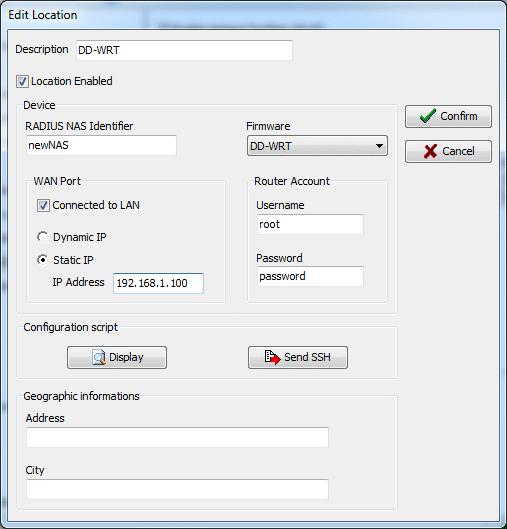
As you can see from the example, for the router's WAN port we have used IP 192.168.1.100. Should your ADSL router have an address in a different network (for example 192.168.0.1) we should choose an IP such as 192.168.0.100.
Installation of the firmware
Now let's see how to replace the wireless router's standard firmware with the
DD-WRT firmware.
Firstly, we download the DD-WRT firmware of our router from the site
http://www.dd-wrt.com/site/support/router-database choosing Standard Generic firmware from the list of those available for our wireless router. In some cases, before installing the Standard Generic firmware, you may need to install the mini or micro so you will have to refer to any notes on the site.
As for the firmware OpenWRT we will download the file by locating our router model on the list available at http://wiki.openwrt.org/toh/start.
If you choose CoovaAP firmware (only available for Linksys 54G and GL) the
firmware must be downloaded at
http://www.coova.org/CoovaAP/Installation.
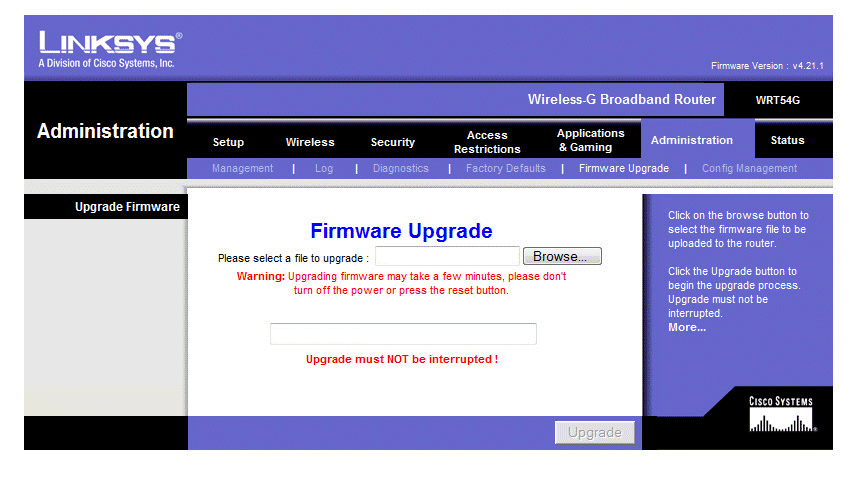
Now, let's see how to install the firmware that we have just downloaded onto Linksys 54GL. We connect a PC to one of the router's 4 LAN ports and we access the configuration interface by opening the browser at http://192.168.1.1. After having typed in user name and password (Leave the username blank and enter "admin" as the password), we click on the 'Administration' page and then 'Firmware Update'. With the 'Browse...' button we select the .bin file of the downloaded firmware and proceed to install with the 'Upgrade' button.
Configuration of the wireless router
From the PC connected to the wireless router we again open page http://192.168.1.1 (username "root", password "admin"). At this point the procedure differs slightly depending on the firmware to be configured :
DD-WRT firmware
When accessing for the first time you will be asked to type in the new values for the access data: with reference to the example of the location just created, we use 'root' as user name and 'password' as the access password. At this point you need to set up the WAN port's IP address by clicking on the 'Setup' menu and then on 'Basic Setup'. In the first section (WAN Connection Type) we set up the connection type on 'Static IP' and the address in the following way:
-WAN IP : 192.168.1.100
-Subnet mask : 255.255.255.0
-Gateway : 192.168.1.1
-Static DNS 1 : 8.8.8.8 (google Public DNS)
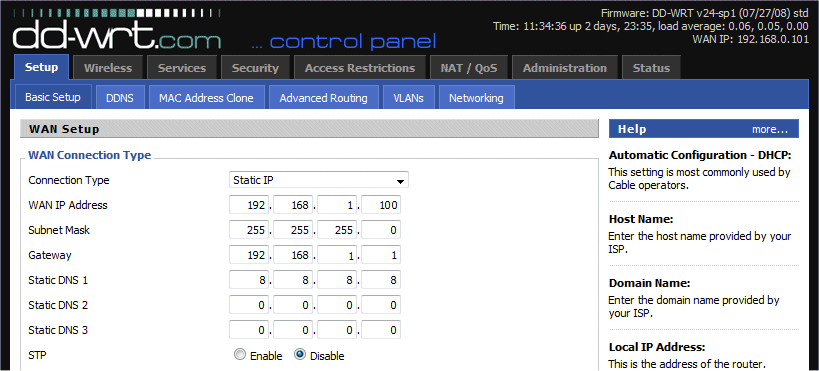
Where 192.168.1.1 is our ADSL router's address. Should the ADSL router be set up on a different network, for example 192.168.0.1, the configuration will be as such:
-WAN IP : 192.168.0.100
-Subnet mask : 255.255.255.0
-Gateway : 192.168.0.1
-Static DNS 1 : 8.8.8.8
In the 'Network Setup' section we have to set up the router's (LAN port) address that should belong to a different network than that of the WAN port. For example we can set this address on 192.168.50.1.

At this point all that is left is to enable the WAN port's SSH access: we click on the 'Services' menu and enable the 'SSHd' entry in the 'Secure Shell' box.

Finally we click on the 'Administration' menu and in the 'Remote Access' section enable the 'SSH Management' entry.
Now we can disconnect the PC from the wireless router and connect our ADSL
router to the wireless router's WAN port. We move on to the server and back to
the location window previously viewed. We send the configuration script by
clicking the 'SEND SSH' button: the router will reboot and the configuration will be terminated.
There is also another method for carrying out the configuration script on the
router: from the router's WEB interface we click on 'Administration' and then on
'Commands'. In the 'Command Shell' box we paste the script taken from page http://IP-SERVER/setup.htm (where IP-SERVER represents the address of the server that carries out Explorer
Manager, for example 192.168.1.2) and click on the 'Run Commands' button.
OpenWRT Firmware
For the OpenWRT firmware we have to login to the router by clicking on "Login", then "Go to password configuration..." and set the new password (e.g. as password "password", and as user "root"). To allow the SSH access go to "Network | Firewall" and in the "Zones" box set WAN (input) on "Accept". Now configure the WAN and LAN ports in "Network | Interface" section don't forgetting to click on "Save and Apply" at each change.
CoovaAP Firmware
The set up of the CoovaAP firmware is very similar: you will need to set up the WAN port by accessing the "Network" menu and then the "WAN" section. To enable SSH access on the WAN port we need to access the "Settings" section on the "System" menu and set the "WAN SSH Access" to "Enabled".
Remote location
Now let's see the relevant configuration should the Wireless Router not be directly connected to the same LAN as the server but connected to any remote network.
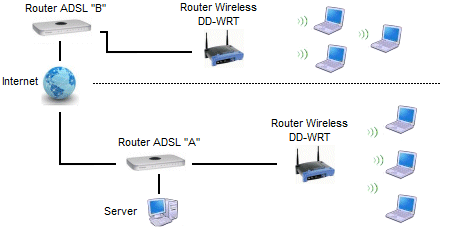
Let's suppose, for example, that the server is connected to ADSL Router 'A' while the wireless router is connected to ADSL Router 'B'. In this case, in the location set up seen at the beginning it is necessary to specify ADSL router 'B''s public IP address. In this same router the 22 TCP and 3779 UDP ports need to be turned towards the wireless router's IP (192.168.1.100 in the example). Finally, in ADSL router 'A' the ports 80 TCP, 9393 TCP, 1812 UDP and 1813 UDP ports need to be turned towards the server's IP (192.168.1.2) in the example.
Softvision - Via Cesare Battisti, 101 - 67051 Avezzano (AQ) ITALY - P.IVA 02081660660 | Privacy Policy - Cookie Policy